
Interface
This page describes Bernard's views, the Property panel, the production objects and the settings window. The help buttons in the application open the section that concerns them directly.
Bernard's interface is in English: labels are quoted as they are, in italics.
Layout of the main window
The main window assembles view windows. Each one can be docked or floating, and can change its view type. Bernard restores them at startup.
The top menu is described in Top Menu.
What can get in the way: without the Can override View Presets (tab parameters) with custom filters permission, the entries of the Windows menu are greyed out. You then work in the views imposed by the studio presets.
The selection is shared. Choosing an object in one view shows it in the others: Property panel, node view, planning. Drag and drop also links the views: drop objects onto a spreadsheet to widen its scope.
Each view has its tab bar. A tab is a saved view: its scope, its columns, its filters, its sort, its colour and its
icon. The menu of a tab offers Add new, Edit Tab, Save this tab changes, Save all tabs changes, Reload, Copy
Tab / Paste Tab, Copy Tab Settings / Paste Tab Settings, Access rights (Read, Edit view), Copy Access
rights / Paste Access rights. Delete and Clear saved settings appear with the Ctrl key (More options available
with CTRL). A tab that has been modified and not saved is marked "*".
Studio tabs and personal tabs. A tab is created by right-clicking in the tab bar › Add new: it takes over the view of the tab being displayed. The Save this tab changes menu only appears if the tab has been modified. As long as you have not saved, your changes stay when you switch tabs, but they are lost if you close Bernard. There are two tab areas: the studio tabs, seen by everyone who has access to them (blue-green tint), and your personal tabs (grey), which only you see. Creating and modifying studio tabs requires the Can create and modify global View Presets (tab parameters) permission; without it, the studio tabs menu is limited to Reload and Copy Tab (to make a personal copy of it). See also View Presets.
Top Menu
What it is for: opening views, adjusting Bernard, navigating the tree and finding help. The menu bar is at the top left of the main window.
At its right end, the bar shows the version of Bernard, the company and the database you are working on, then your user name and the name of your workstation. This information is also useful for support.
The bar contains four menus.
| Menu | Content |
|---|---|
| Bernard | Show Splashscreen, Check Current Computer, Data › Export › Timelogs, Settings, About Bernard, Quit Bernard |
| Windows | the view types to open, then Image viewer and Bernard Log (Ctrl+Shift+L) |
| Navigate | Go To Root (Ctrl+Home), Shortcut And Navigation, Select Parent (Home); Login as for administrators |
| Help | Website, Users Guide, Bernard user community, Youtube Channel, API Documentation |
Windows
This menu lists the view types: Tree View, Spreadsheet, Spreadsheet Multi, Nodal View, Property View, View Presets, Path Edit, File Operations Log, Action Log, Performance, Working Time View, Planning View, Activity View. An entry only appears if your role can create that view.
Choosing an entry opens a new view window, floating. You can open as many as you want, including several of the same type: two spreadsheets, a spreadsheet and a node view… Arrange them as you like, for example on a second screen. Each window keeps its scope, its columns and its filters.
Two entries open something other than a view:
- Image viewer opens an empty viewer. Drag files or sequences from your disk onto it to look at them, without linking them to a Bernard object.
- Bernard Log opens the application log. See Import, export and logs.
What can get in the way: without the Can override View Presets (tab parameters) with custom filters permission, all the entries of this menu are greyed out.
Bernard
The Bernard menu groups:
- Show Splashscreen: show the startup welcome screen again. You turn it off at startup with Local Settings › Show splashscreen (see Local Settings).
- Check Current Computer: check that Bernard knows your workstation, and change it if needed (see Security).
- Data › Export › Timelogs: export the time spent (see Import, export and logs).
- Settings: the settings window (see Bernard Settings). The sections you see depend on your role.
- About Bernard and Quit Bernard.
Navigate
- Go To Root (
Ctrl+Home) goes back to the studio root. - Select Parent (
Home) selects the parent of the selected object. By repeating it, you go up one level each time: from the file to the shot, from the shot to the sequence, from the sequence to the project. - Shortcut And Navigation opens the Keyboard shortcuts page.
- Login as (administrators): see Security.
Help
Help opens in your browser the Bernard website (Website), this guide (Users Guide), the user community (Bernard user community), the video channel (Youtube Channel) and the documentation of the Python API (API Documentation).
Tree (Tree View)
What it is for: navigating the whole studio. You find the projects, folders, items, tasks, files, and the administration objects: users, workstations, categories, properties, settings.
Where to open it: Windows › Tree View.
What you can do
- Change project: the name of the active project is shown at the top of the view. Navigate › Go To Root
(
Ctrl+Home) goes back to the studio root. - Filter object types: the Show settings button in the title bar opens a menu of checkboxes: Action, Computer, Custom property, Default property, File, Folder, Group, Image, Instruction, Item, Note, Project, Properties Layout, Server, Task, Trigger, User, Workflow.
- Show the settings: in the same menu, Settings adds the Root Settings or Project Settings panel below the tree (see Root Settings). Root adds a panel on the root when you are inside a project.
- See deleted objects: Deleted Object (administrators only).
- Act on an object: right-click. The menu offers the object's actions: Create, Rename..., Copy, Cut, Paste, Paste Special, Delete, Import From Files, Import From Table, Instructions From Table, Ingest Wizard, Download, Upload, Add To Playlist, Add Correction or Note… depending on the object type and your permissions.
- Reorganise by drag and drop, or drop files from your disk onto an object.
- Find the selection again: hover over the tree and press
F. Bernard expands the folders down to the selected object, however deep it is. - Rename the selected object with
F2.
What can get in the way: without the Can filter content types displayed in the Tree View permission, the filters are not accessible. The Create and Delete entries depend on the Can Create and Can Delete permissions of your role.
Spreadsheet
What it is for: seeing and editing many objects at once. One row per object, one column per property. It is the production's working view.
Where to open it: Windows › Spreadsheet. The spreadsheet is available everywhere: at the studio root, it mostly lists technical objects (items, users, workstations, categories); in a project, it lists what you produce (characters, vehicles, sets, shots). You can open as many as you want, each with its own scope.
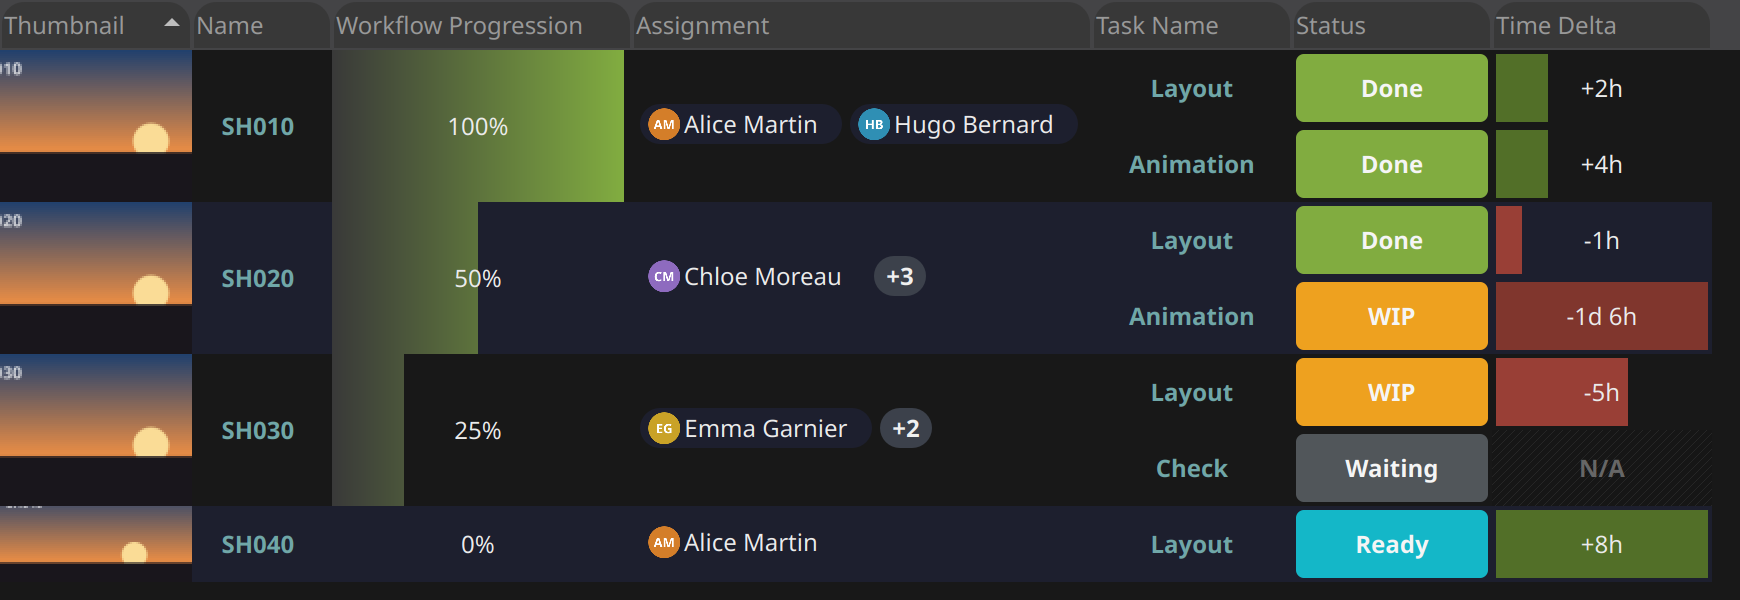
What you see
- Task states as coloured pills, assignments with the avatars of the people ("+3" when there is not enough room), workflow progress as a bar.
- The Time Delta: the gap between the budget and the time spent, green when within budget, red when over.
- A cell that does not apply is hatched and marked "N/A".
- A column you cannot modify is greyed out, with a padlock in its header and the mention Locked (Read-Only) in its menu.
- The bottom bar: total number of items, filtered items, loading time, thumbnail progress. Right-clicking a column of this bar chooses an operation (sum, average, minimum, maximum, distinct values, count). Copy footers copies these totals.
The toolbar
| Button | Effect |
|---|---|
| Item view mode | switch from the row display to the thumbnail display |
| Zoom items | enlarge or reduce the display (Ctrl + wheel does the same) |
| Filter Type | choose the types of objects and tasks to display, for example remove the assets or a task type |
| Filter | quick filters: My Items (your objects), Has Correction, Has No Correction, Current Tasks, My Tasks |
| Header | choose the displayed columns, per object type |
| Grouping | arrange the rows by the value of a property, for example the parent's name |
Current Tasks keeps, for each item, only its current task: the one it has reached in its workflow. Without this filter, the spreadsheet shows all the tasks, including finished ones, aborted ones and those not yet started. For production tracking, keep it ticked.
In Header, columns are offered by object category: item, compound, task. Drag a column to move it. The columns of a task are arranged in groups: name and department, state, assigned people.
The scope. The scope bar says what the spreadsheet looks at. Drag objects from the tree onto it, or drop them directly onto the spreadsheet, to widen it. Remove some to narrow it. For example, for a view that only shows characters, remove the assets folder and add the characters folder.
Filtering
Each column has its header filter. Text filters ignore case:
| Input | Result |
|---|---|
Paul Jacques or Paul, Jacques |
Paul OR Jacques |
Paul + Jacques |
Paul AND Jacques |
Item |
contains "Item" |
Ite* |
starts with "Ite" |
*em 1 |
ends with "em 1" |
The ≠ button inverts the filter: it keeps the rows that do not match.
Dates are filtered with 01/01/2026, > 01/01/2026, < 01/01/2026, 01/01/2026 -> 15/01/2026, Today,
Today -7, Today +7. Durations are written 1d, 4h, 2.5d, 30m.
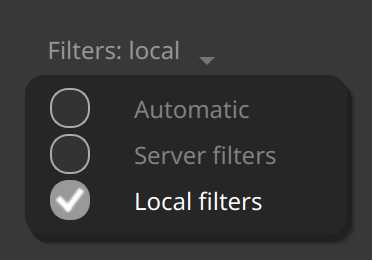
The tab's Filters menu chooses where the filters apply:
| Choice | How it works |
|---|---|
| Local filters | all the rows of the scope are loaded; the filters apply instantly on your workstation. For small scopes. |
| Server filters | only the useful rows are loaded. A whole project opens in a few seconds. |
| Automatic | a studio rule chooses depending on the scope (see Global Settings). |
Other tools
- Columns: the header menu offers Remove Column, Lock Column / Unlock Column.
- Copy to Excel:
Ctrl+Cor Copy selection as table (TSV). Identifiers are replaced by names. - Paste, spread: Paste Special, Spread Values Precisely.
- Lists: an editor with checkboxes, with search, Select All, Clear All and the creation of a value without leaving the list.
- Thumbnails: a thumbnail mode, adjustable with Zoom items or
Ctrl+ wheel. - Right-click on a cell: the actions of the object under the mouse (task, subtask or item).
- Scope: drag and drop objects onto the spreadsheet or into its scope list to widen it.
- Stable rows: when the model changes under the view (a task validated, added or removed elsewhere), the displayed rows no longer move. With server filters, validating a task does not display the next task of the workflow either if the column filters exclude it.
What can get in the way: without the Can change the spreadsheet's query scope permission, the scope list is read-only. The write permissions of each property also apply.
Spreadsheet Multi
What it is for: following a production step by step. One row per item (for example a shot), and one group of columns per compound of the workflow or per department. Each group shows the resulting state of the compound and its current task: name, state, assigned people.
Where to open it: Windows › Spreadsheet Multi.

Setting it up
- In the scope bar, choose the project and the template of the items to follow (for example Shot).
- In the Header menu of the toolbar: Add Compound Group (one group per compound of the template) or Add Department Group (one group per department).
- In the menu of a group: Add Column to Group adds a property of the compound; Compound Current task adds a property of its current task. Ticking adds the column, unticking removes it.
A group is removed from its menu, Remove Group. Groups have their own filters: a filter typed in a group only applies to it. The layout is saved with the tab. The other tools (toolbar, header filters, scope, copy to Excel) are those of the spreadsheet.
What can get in the way: Add Compound Group and Add Department Group are inactive as long as no template is chosen (No model selected), and show No compound available or No task available if the template has none.
Nodal View
What it is for: seeing and building the workflow of an item: its tasks, their links, its compounds. You also follow where the item stands.
Where to open it: Windows › Nodal View, then select an item or a task.
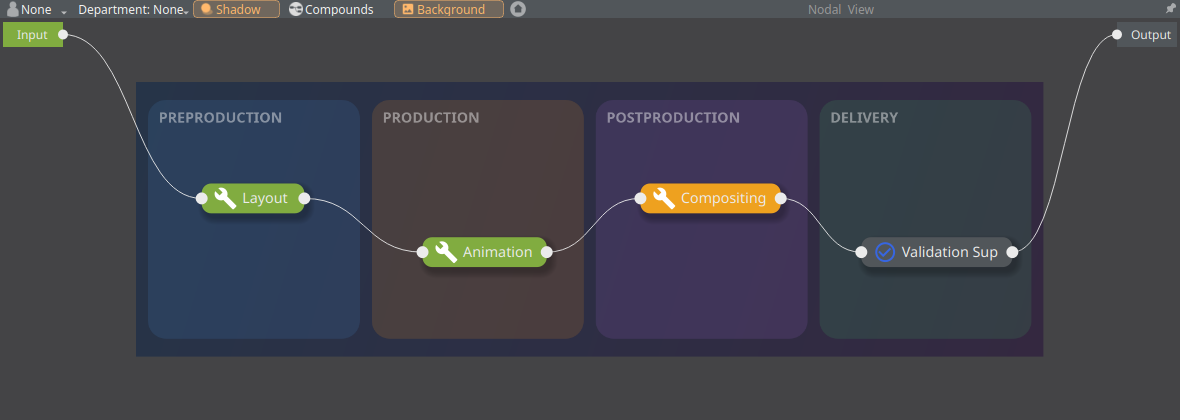
Two modes
- Production: the workflow of a reference, read-only. You see the states, the assignees and the current task.
- Edit (Edit Workflow), on a template: the border changes colour, the Save and Cancel buttons appear. On saving, the modification propagates to the references, with a progress window.
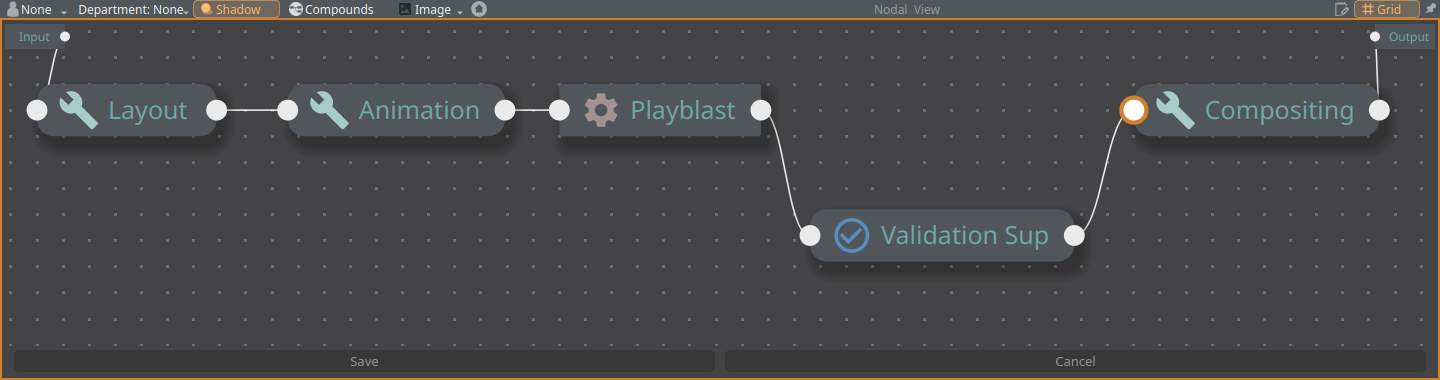
What you can do
| To | Do |
|---|---|
| Zoom | wheel |
| Pan | drag with the middle button, or with Alt |
| Frame everything | Reset View, or A |
| Frame the selection | F |
| Create a task | right-click on the background (work task, validation task, script) |
| Create a compound | select tasks, then Ctrl+G (in edit mode) |
| Expand or collapse a compound | double-click |
| Link two tasks | drag from an output port (right) to an input port (left) |
| Copy, cut, paste | Ctrl+C, Ctrl+X, Ctrl+V; links between copied tasks are kept |
| Align | right-click several tasks › Align (Align H left, Align H right, Align H center…), Smooth nodes position |
| Snap to the grid | Grid (in edit mode) |
| Exchange tasks | Export tasks to JSON... / Import tasks from JSON... |
| Export an image | Export view as picture... |
Display: Shadow (shadow of the tasks), Compounds (semi-transparent compounds), Background (background image), Department: (None, Glow, Banner, Banner & Glow), Show users assignment mode (None, Current Tasks, Users Tasks, All Tasks). These settings are kept for each user.
Background image: on a template, Load background picture... places an image under the workflow. All the references of the template display it. Remove background picture removes it.
What can get in the way: editing requires the Can modify active Workflow structures (Add/Remove tasks) permission. The tasks of a template stay Waiting or Aborted: a template does not "work".
Path Edit
What it is for: checking and correcting the paths of all the files of a selection. For a given path variation and system, you see the expression of each file and the path it gives.
Where to open it: Windows › Path Edit, then select an item.
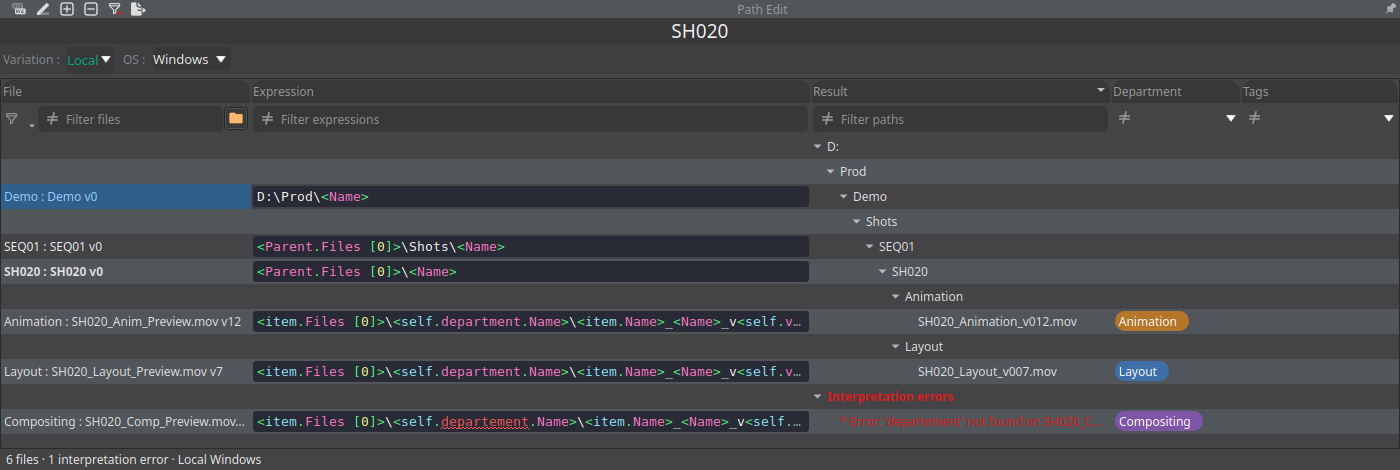
What you can do
- Choose the variation (Variation) and the system (OS) displayed.
- Search with
Ctrl+F(Search in the expressions) and replace withCtrl+H.F3andShift+F3go to the next or previous result. Options: Match case, Whole words, Regular expression, Show the replacements (preview of the new path), Also replace in the expressions inherited, Matching files only. Replace and Replace all act on the ticked files. - Filter the columns (text, with the ≠ button), by parent type, department or tags.
- Display: Expand all / Collapse all, Edited expressions only (for the variation and the OS shown), Show the file's parent with its name.
- Edit an expression in the cell: it is coloured, with autocompletion. An unknown name is underlined in red, and interpretation errors are grouped together.
- Right-click: Copy the path, Copy the expression, Use the inherited expression.
- Export the paths, or Export the expressions (json).
The syntax of expressions is described in Expressions and paths.
What can get in the way: modifying the paths of a variation requires the Can modify file paths for specific Path Variations permission.
Planning and working time
The help button of the Working Time View opens this section. It also describes the Planning View.
Attendance and working time (Working Time View)
What it is for: seeing the team's attendance and working time. A users × days grid, by default on the current month.
Where to open it: Windows › Working Time View.
- One row per user (arranged by role), one column per day, with start and end dates. Auto Hide User hides those who have nothing.
- A cell shows the day type, Working Time, OverTime, Presence, TimeLog, Arrival, Departure. Its colour goes from red to green depending on the gap from the expected time.
- A late arrival is marked beyond the studio's tolerance (Late Margin, see Working Time).
- Right-click: Change Presence Type, Set Presence Type, Edit Attendance, No Late Penalty, Reset Late Penalty.
- By selecting several cells, you see the average arrival and departure times and the totals.
What can get in the way: without Can view other users' working time (Access HR Data), you only see yourself. Modifications require Can manually edit aggregated Working Time or Can manually edit System Attendance logs.
Gantt and workload (Planning View)
What it is for: planning work over time and seeing the team's workload. The Planning View shows at the top a Gantt chart (one bar per planned object) and, below it, one or two workload timelines (Workload), on the same time scale.
Where to open it: Windows › Planning View, then choose the planning at the top of the view (Scenario:).
A planning keeps its own dates for each planned object: you prepare a planning without touching the tasks, then you validate it (Validate your plan). Several plannings can coexist.
In short:
- Gantt: drag a bar to move it, pull its edges to resize it. Right-click offers to plan the selection (Plan from, Plan Until, Plan To End On, Plan To Parent), to adjust the dates to the time spent (Fit Dates To Time Logs), to remove objects and to validate the plan.
- Workload: compares, per period, the budget (Bid) and the time spent, per person. A drop-down menu of the timeline exports the workload (Export to EXCEL, CSV, HTML, JSON, CLIPBOARD).
- Zoom: the Day, Week, Month and Fit buttons of the Gantt zoom section, their shortcuts and
Ctrl+ wheel set the time scale.Ctrl+ZandCtrl+Yundo and redo a date change,Esccancels a drag in progress. See Keyboard shortcuts.
The details of planning, workload and working time are in the page Time spent, attendance and planning.
View Presets
What they are for: saving a complete layout of the main window (the view windows and their settings) and switching from one to another. A role can have the studio presets imposed on it.
Where to open them: Windows › View Presets. The view shows two bars: on the left the studio presets, shared, on the right your personal presets. Click a preset to apply it.
What you can do: the menu of a preset is that of the tabs (Add new, Edit Tab, Save this tab changes, Copy Tab, Access rights…). The access permissions of a preset say who sees it (Read) and who modifies it (Edit view), per user or per role.
What can get in the way
- Creating and modifying studio presets requires Can create and modify global View Presets (tab parameters). Otherwise, you only have your personal presets.
- Without Can override View Presets (tab parameters) with custom filters, the studio presets are imposed as they are.
- A preset you have no read permission for does not appear (except for administrators).
Property panel (Property View)
What it is for: seeing and modifying everything about the selected object, in tabs.
Where to open it: Windows › Property View. The panel follows the selection. The pin in its title bar freezes it on the displayed object.
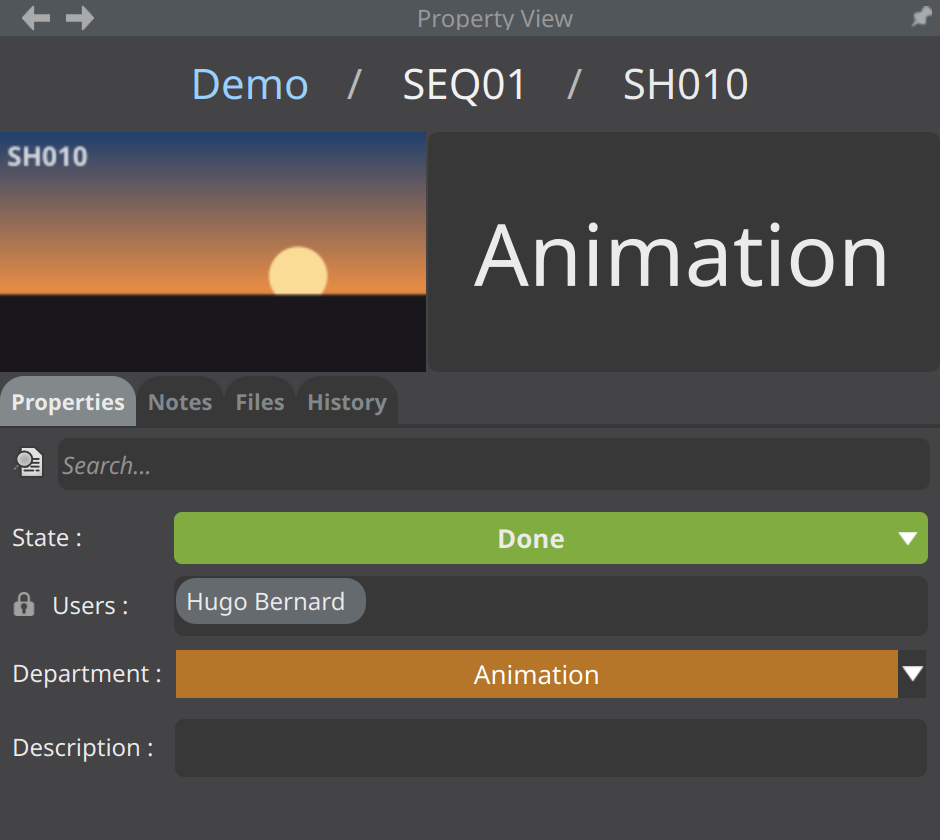
The header shows a clickable breadcrumb of the parents, the thumbnail and the name of the object. Ctrl + wheel
adjusts the size of the thumbnail and of the title. The Select Backward / Select Forward arrows walk through the
history of your selections. The panel adapts to narrow widths: long names are shortened, the full name is in a tooltip.
Select many objects at once (hundreds of shots, for example): the panel responds immediately, shows "Loading N items" and fills in its properties as it goes.
The tabs depend on the object type and on your role: Properties, Attributes, Instructions, Notes, Files, History, Assignment, Paths Variation, Path Variation Settings, Actions, Connections, Tech. A Search... field filters the content of several tabs.
| What you are on | Tabs you see |
|---|---|
| an item (Project Item) | Properties, Files, Notes, Assignment, Actions, History |
| a task | the same, plus Instructions |
| a workstation (Computer) | Properties, Path Variation Settings, History |
| a user, a category… | Properties and History; Attributes for a studio property |
| your own user record | Connections as well |
| whatever the object, if you are an administrator | Tech, last |
Customising the tabs (administrators, on a template)
- Drag a tab to change the order; the order is saved on the template.
- Visible for... chooses the roles that see a tab. Copy Tab Visibility / Paste Tab Visibility carry this choice over to another template.
Properties
What it is for: reading and modifying the object's properties (state, users, department, dates, budget, texts, lists, images…).
What you can do
- Modify a value directly in its field. On a selection of several objects, the modification applies to all of them.
- On a template, choose the mode of a property: Set Mode to Local (each reference keeps its value) or Set Mode to Global (the template's value is imposed on all its references). Bernard announces the number of elements affected and asks for confirmation.
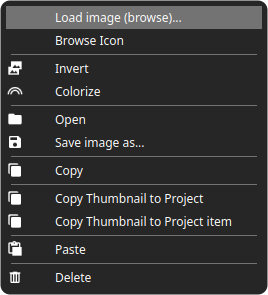
- Load or save an image without drag and drop: Load image (browse)... and Save image as... in the thumbnail menu.
- Copy a colour from one property to another: Copy Color / Paste Color.
Layout of the properties (administrators, on a template): the tab menu offers Create Layout, Edit Layout, Copy Layout, Paste Layout, Delete Layout. While editing: Add Group, Add Separator, Add Splitter (two properties side by side), the Unassigned Properties list, then Save Layout or Cancel. The layout is stored on the template: all its references share it. It is locked while an administrator is modifying it (Layout Locked).
What can get in the way: a read-only property, or one whose write access does not include you, cannot be modified. Set Mode to Local / Global requires the Can toggle properties between 'Global' and 'Local' inheritance permission.
Instructions
What it is for: displaying a task's instructions, and knowing who has read them. The tab only exists on a task (work or validation), not on an item.
An instruction is a text, possibly with attachments. It can be checkable (Is Checkable): to tick it, the person confirms they have seen the information. Bernard keeps who ticked what: one column per person, a ticked instruction is shown in green. The person who then validates the task therefore sees everything that was ticked.
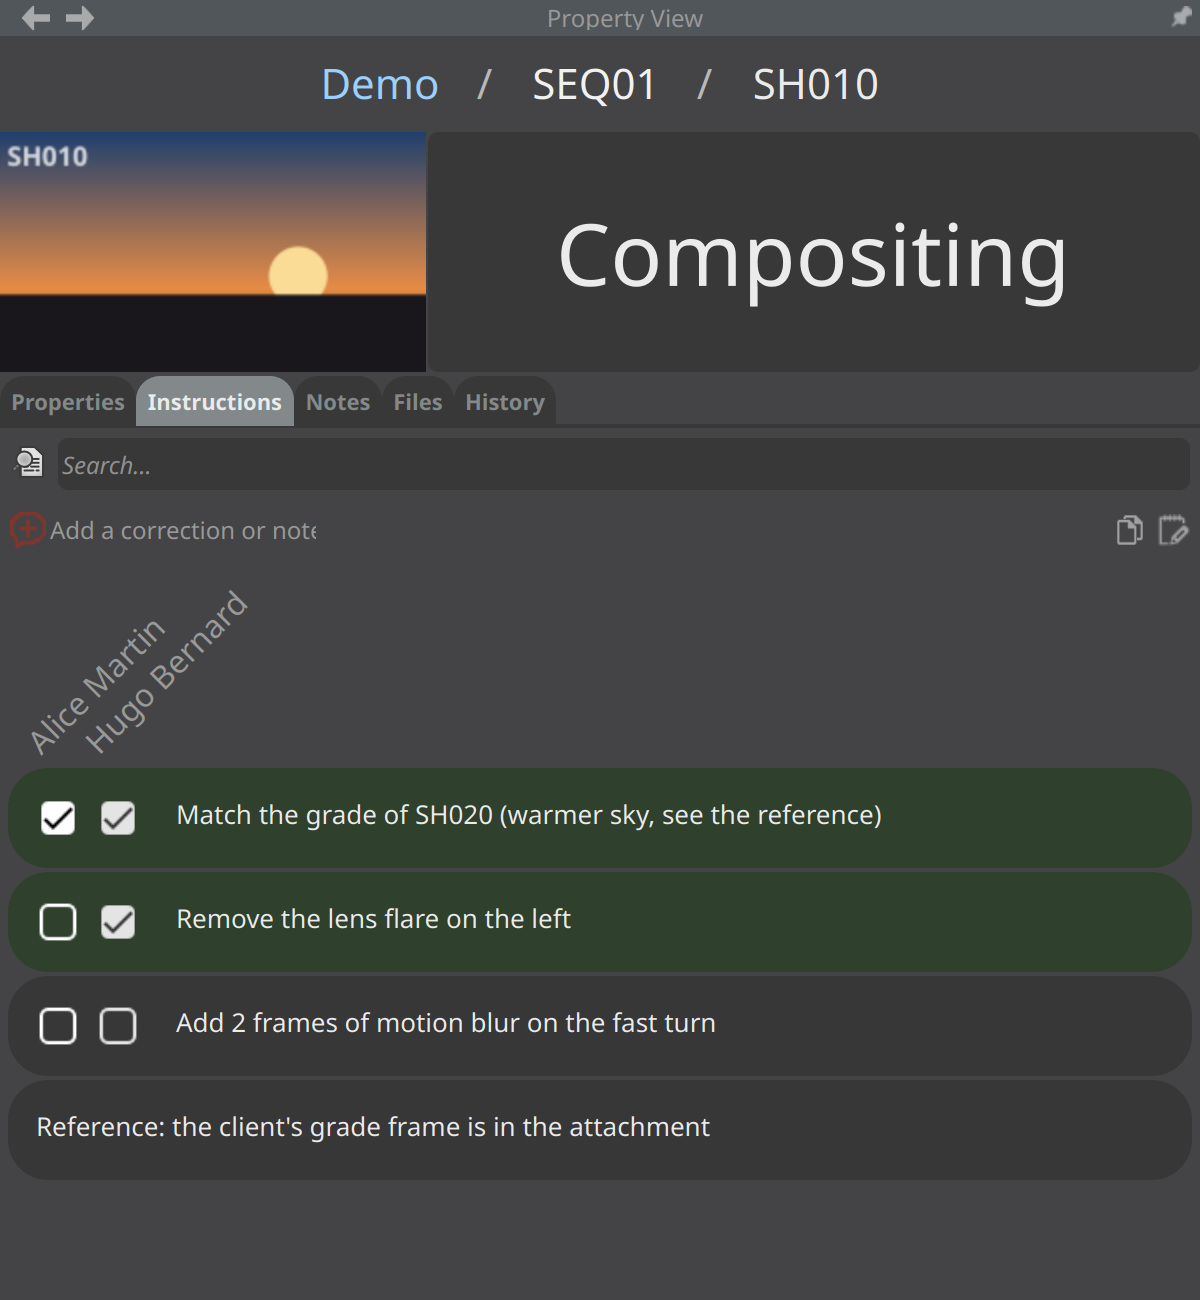
A task can require that all its instructions be ticked before it goes Done.
What you can do
- Tick the instructions, as you work.
- Add a note or a correction from the tab: Add a correction or note.
- Copy a task's instructions (menu of the Copy Instruction button: Copy Instructions, Copy Text), and paste them onto another task (Paste Instructions).
- Edit the instructions (Edition Mode button): an add button creates an instruction, Is Checkable makes it checkable, the Move Up and Move Down arrows move it, then OK or Cancel. The text of an instruction accepts files dropped as attachments.
- The Search... field filters the instructions.
To create many instructions, use Instructions From Table (right-click): paste a table copied from Excel or Google Sheets and match each column. See Import, export and logs.
What can get in the way: editing requires the Can Create or Can Delete permissions of the Instruction type (or being an administrator), and a single selected task.
Notes
What it is for: reading and writing the notes and corrections of an object, and replying to them.
What you can do
- Add a correction or note opens the note window: Context, Type (Normal or Correction), Category, To, Weight (for a correction), File and its version, the text and attached images.
- Tick Assign me to this task to assign the task to yourself while writing the note.
- Publish the note with OK or
Ctrl+Enter. - Reply to a note with Reply.
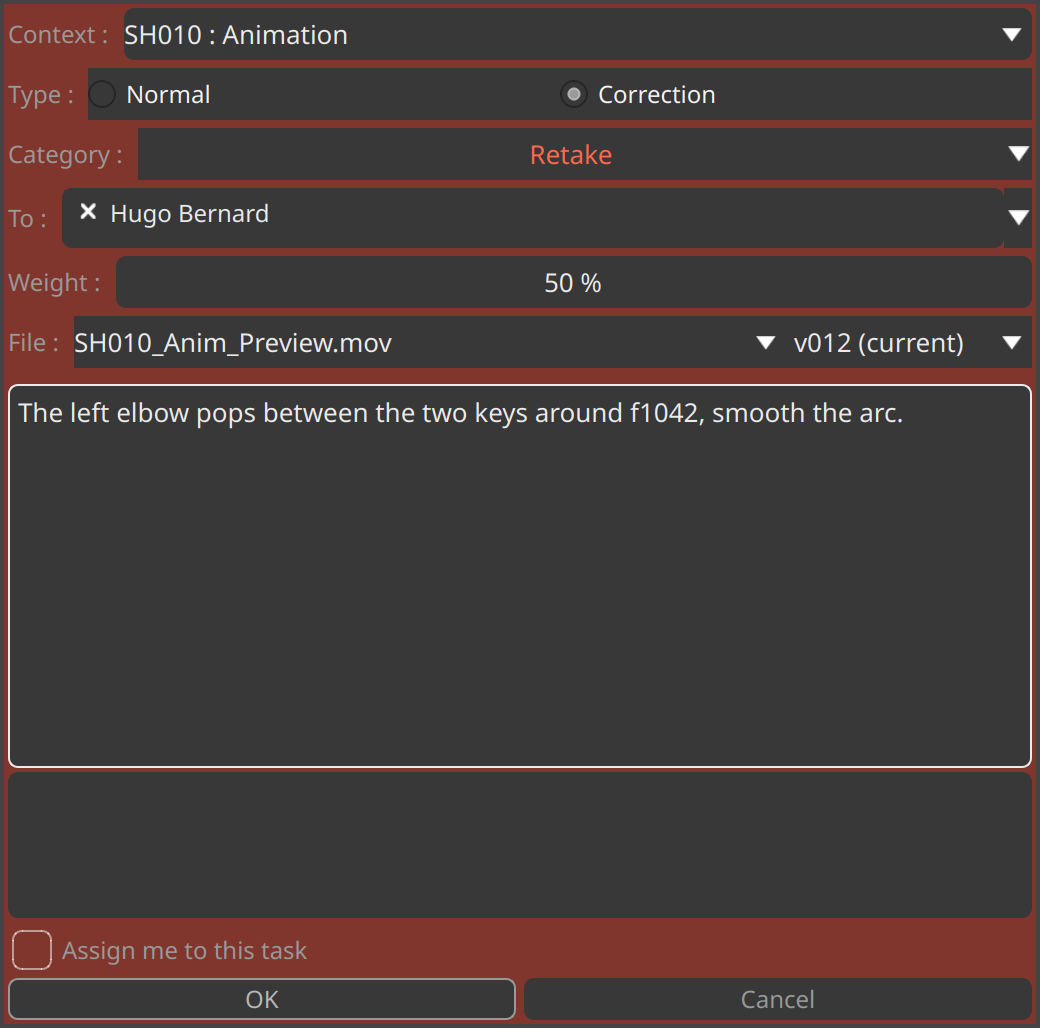
A correction is a retake. As long as it is not ticked as done, it is active. A new correction puts the task back to Ready (unless it is WIP), and the task cannot go Done while a correction is active. The task's assignees and the To recipients are notified.
A note about a file shows a banner: the file, the commented version, the review verdict, and a Play button that plays back exactly that version.
What can get in the way: creating or deleting a note depends on your role's Can Create / Can Delete permissions for the Note type.
Files
What it is for: seeing the object's files, their versions and their presence on the disk.
What you can do
- See for each file its path, its current version and whether it is present on your workstation. Bernard watches the folders and updates this presence live.
- Add a version: drop files onto the file's row, or choose Add file (browse)....
- Open or explore a file (Open, Explore), copy its path (Copy Path).
- Arrange the files: Edit Layout sets their order (administrators, on a template).
The details (creation, versions, copies) are in File management; paths are in Expressions and paths.
What can get in the way: Can create files on models / references, Can delete files from models / references, Can arbitrarily reorder files inside folders.
Assignment
What it is for: saying who works on the tasks of an item. You assign department × role pairs, not tasks one by one.
How it works
- Each task has a department and an expected role (Assign To).
- The item's Assignment tab gathers all the department × role pairs of its tasks.
- Put people in a pair: all the tasks of the item that have this pair are assigned to them.
- A pair where nobody has been put is automatic: if there is only one project user (Project Users) with this role and this department, they are assigned; if there are several, nobody is.
- The assignment can be forced task by task.
Tools: the Update Automatic Assignment button recomputes the automatic pairs; right-click a pair › Reset Automatic Assignment makes it automatic again. Edit Layout sets the order of the pairs (administrators).
Assign Me: from a note, a review or a right-click on a task, you take the task's department × role pair in place of those who were there. The task's state does not change.
What can get in the way: the spreadsheet's Assignment column is computed and read-only (padlock).
Actions
What it is for: seeing and launching the actions attached to the object. An action is a command registered in the studio settings: launching a script, changing a value, reassigning…
What you can do
- Launch an action with its button. Actions are arranged by department (No Department for the others).
- Assign a new action to the selected objects (Assign a new action to the selected elements button). On a template, it applies to all its references.
- Launch an action on a selection by right-click, in the submenu of its department.
Bernard runs actions in a queue, three at a time by default (Local Settings › Max Simultaneous Action). The Action Log view follows their execution: running, succeeded, failed, with their output.
What can get in the way: Can assign actions, Can remove assigned actions. An action is only visible if its read access includes you.
History
What it is for: knowing who changed what, when and from which workstation.
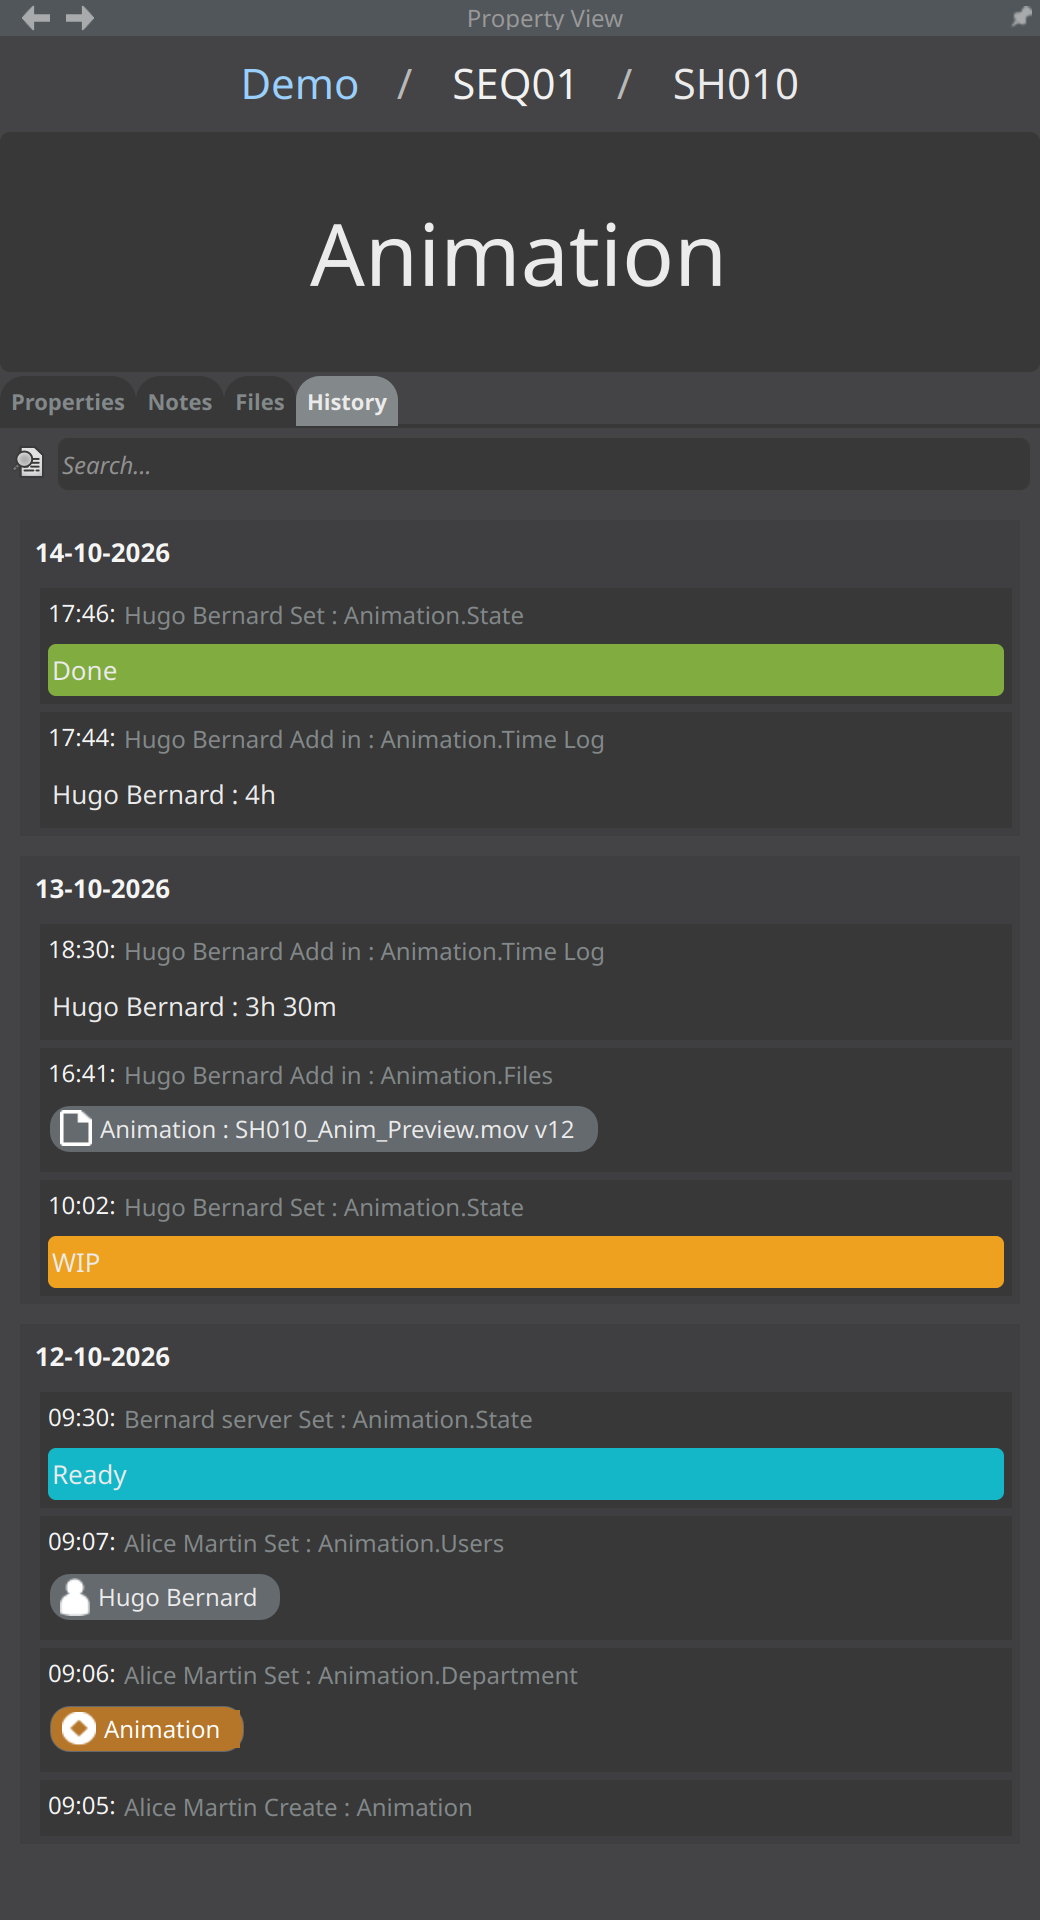
The server writes the history of each object, whichever workstation made the modification: creation, new value of a property (including states), addition or removal in a list, deletion and restoration, switch to Local or Global, time spent.
Entries are grouped by day and load as you scroll. The Search... field filters by property. Designated objects (file, user, department) are shown as pills.
Tech
Reserved for administrators.
What it is for: giving the technical information of the selected object, to understand a problem or inform support. The tab always comes last.
What you see: one row per piece of information, each with a copy button.
| Information | Meaning |
|---|---|
| Node ID | the object's internal identifier |
| Property Path (IDs) | its path, in identifiers |
| Resolved Path (Parents) | its path, in names of parents |
| Children (ID & Name) | its children, with their identifier and name |
| Model | the template it is a reference of |
| Is Model | whether it is itself a template |
| Document Size | the size of its document in the database |
| Group | the groups it belongs to |
Two buttons are at the bottom: Copy All Tech Info copies all this information; Download BSON Document saves the object's raw document to a file.
When you have selected several objects, the Selected Node: list at the top of the tab chooses the one you are inspecting.
Attributes and path variations
- Attributes: the tab of the studio properties themselves (a property selected in the settings).
- Paths Variation and Path Variation Settings: the paths of a file for each variation and each system. See File management and Expressions and paths.
Connections
The Connections tab only appears on your own user record, just before Tech. It links your Google account to Bernard.
- Select your user record, then the Connections tab.
- The tab says Not Connected or Connected to : followed by the account's address.
- Click Connect to your google account, and follow the Google sign-in page that opens. Bernard shows Waiting for authentication... then a success or failure message.
- Disconnect current account removes the connection.
Objects: Project Item and Item
All of the production is stored in the tree. The main objects are described below. Each is created by right-clicking its parent › Create › the name of the template or type; the Create New … window asks for at least a name.
Project Item
What it is: a production element of a project, for example a shot or an asset. It carries a workflow of tasks, properties, files and an assignment. It is created from a template (Project Item Model), of which it is a reference: it receives a copy of everything the template carries and stays linked to it.
Where to create it: in a project, right-click a folder › Create › the template you want (for example Shot). The menu only offers the templates that this folder accepts.
Folders (Folder) store the elements of a project: sequences, episodes, asset categories. They are created in the same way (Create › Folder).
Good to know
- Modifying the template propagates to the references: a task added to the template's workflow is created on all its elements. It is created Aborted where the work has already gone past it, Waiting elsewhere: a finished shot stays finished.
- Propagation shows its progress, can be paused and resumes after an interruption.
What can get in the way: Can Create / Can Delete for Project Item and Folder in your role's permissions.
Item
What it is: a generic element of the studio, stored outside the projects (the Items folder at the root). It can carry files and properties, but no workflow. The studio uses it, for example, to describe its applications and its file extensions (which application opens which file).
Where to create it: at the root (Navigate › Go To Root), right-click the folder you want › Create › the item template.
What can get in the way: Can Create / Can Delete for Item in your role's permissions.
Settings (Bernard Settings)
What the window is for: adjusting Bernard for the studio, for your workstation and for the roles.
Where to open it: Bernard › Settings. The Bernard Settings window shows the tree of sections on the left, the chosen section on the right. Each section has its help button.
| Section | Contains | Who sees it |
|---|---|---|
| Global Settings | Notification, Working Time (and Day Type), Duration Unit Display, Bernard Image Viewer, File Management, Spreadsheet | administrators |
| Roles Setting | one Role Setting per role | administrators |
| Administration Tools | Clear old references | administrators |
| Local Settings | Notification (and Following), Security, Libraries Paths, Plugins Manager, Views (and Workload) | everyone |
The studio and project settings (Root Settings, Project Settings) are not in this window: they are displayed in the tree.
Root Settings
Reserved for administrators and for roles that have the Can access the Global Root Settings permission.
What they are for: configuring the studio. The Settings folder at the root contains the configuration shared by all the projects: properties, templates, project and task templates, departments, categories, actions, events.
Where to open them: in the Tree View, go to the root (Navigate › Go To Root), open the Show settings menu and tick Settings. The Root Settings panel is added below the tree.
What you can do
- Create and modify the studio's properties: name, type, default value, unit, possible values, Is Interpreted (expressions), Read Access and Write Access.
- Create and modify the templates (projects, items, resources, plannings) and the task templates.
- Manage the categories: roles, tags, project states, note and correction categories, path variations. Each value has a name, a colour, a background colour and an icon.
- Manage the departments, the actions and the events.
What can get in the way: without the permission, the Settings entry does not appear in the Tree View menu. Creating a role creates its Role Setting; deleting it deletes it.
Project Settings
Reserved for administrators and for roles that have the Has access to projects settings permission.
What they are for: configuring a project: its own templates, properties and settings, which add to those of the studio.
Where to open them: in the Tree View, go into the project, open the Show settings menu and tick Settings. The Project Settings panel is added below the tree.
What can get in the way: without the permission, the Settings entry does not appear.
Global Settings
Reserved for administrators.
What they are for: the settings of the whole company.
Where to open them: Bernard › Settings › Global Settings.
| Setting | Effect |
|---|---|
| Idle Timeout | inactivity delay after which a user is considered gone; their WIP tasks then go to Pause (5 minutes by default) |
| Lock Session Timeout | delay before the session is locked (15 minutes by default); must be longer than Idle Timeout |
| Close Session Timeout | delay before the session is closed automatically (2 hours by default), unless scripts or copies are running |
| Max number of lines for the logs of a task script, Max size in kiloBytes for the logs of a task script | maximum size of a script task's log |
| Database read timeout (seconds) | a read that takes longer is interrupted and noted in the log |
| Subsequent scripts are executed first | order of the script task queue |
| Strip new names | processing of the names of new objects |
| Script delay duration | delay before a script task is launched |
| Minimum decimal display for float properties (-1 for dynamic) | minimum number of decimals displayed; can be changed property by property |
The subsections:
- Notification: see Notification (studio settings).
- Working Time and Day Type: see Working Time and Day Type.
- Duration Unit Display: the display unit for durations, Minimum BID Duration, Working Day Duration.
- Bernard Image Viewer: the studio's media player (Media player: Legacy or Bernard Review), the extensions opened by Bernard's viewer, and the opening of a tagged file by double-clicking a thumbnail in the spreadsheet.
- File Management: Bernard Ignore V0. See File management.
- Spreadsheet: Filter engine rule (JSON), the rule that chooses the filter engine (Automatic) according to the scope of a tab; Reset to default restores the original rule.
Local Settings
What they are for: the settings of your workstation and your account.
Where to open them: Bernard › Settings › Local Settings. Everyone has access to them.
| Setting | Effect |
|---|---|
| Max Simultaneous Script | number of script tasks launched at the same time on this workstation |
| Max Simultaneous Action | number of actions launched at the same time |
| Max Simultaneous File Operation | number of file copies at the same time |
| Quiet File Operations | do not open the File Operations Log view at each copy |
| RClone Network Max Usage | maximum share of the network throughput used by copies, in % (90% by default) |
| Auto Cache | automatic caching |
| External Api Port | local port through which the content creation software plugins talk to Bernard; a change requires restarting Bernard |
| Show splashscreen | show the welcome screen at startup |
| Media player | your media player: Studio default, Legacy or Bernard Review |
Media player: Studio default follows the studio's choice (Global Settings › Bernard Image Viewer). If Bernard Review is not installed on the workstation, Bernard uses Legacy.
The subsections:
- Notification and Following: see Notification (your notifications and following).
- Security: see Security.
- Libraries Paths: the path of FFmpeg on this workstation (Path to FFmpeg binary file), with Test and Apply.
- Plugins Manager: the installation of the content creation software plugins.
- Views › Workload: Auto Apply for the planning workload.
Roles Setting
Reserved for administrators.
What it is for: setting the permissions of each role. Each role of the roles category has its Role Setting.
Where to open it: Bernard › Settings › Roles Setting, then the name of the role.
A Role Setting has three panels:
| Panel | Permissions |
|---|---|
| Content edition rights | Can Create and Can Delete per object type (Item, Category, Resource, Project, Project Item, Folder, Group, Playlist, File, Property, Action, Note, Instruction, or All); Can assign actions, Can remove assigned actions; Can create files on references / models, Can delete files from references / models; Can manually abort tasks; Can modify the state of tasks assigned to others (override assignees); Can edit batchs; Can manually edit aggregated Working Time; Can edit existing Timelogs; Can manually log arbitrary timelogs; Can manually edit System Attendance logs; Can modify active Workflow structures (Add/Remove tasks); Can modify file paths for specific Path Variations; Can propagate property values to all child references; Can toggle properties between 'Global' and 'Local' inheritance; Can arbitrarily reorder files inside folders; Can edit event triggers |
| Content display rights | Can override View Presets (tab parameters) with custom filters; Can change the spreadsheet's query scope; Can filter content types displayed in the Tree View; Can view other users' performance data; Can view other users' working time (Access HR Data); Can access the Global Root Settings; Has access to projects settings |
| Role-based behaviours | Can create and modify global View Presets (tab parameters); Compute working time based on Timelogs (vs Attendance); Include extra weekday hours as Overtime |
Whatever the role, these functions stay reserved for administrators: Global Settings, Roles Setting, Administration Tools, Login as, the Tech tab, changing a user's role.
Account management is described in User management.
Security
What the section is for: Local Settings › Security sets your session unlock code. This section also describes Bernard's access controls: accounts, authorised workstations and sessions.
Your unlock code
After a period of inactivity or when the computer goes to sleep, Bernard locks the session. To unlock it, you draw a pattern on a grid of 9 dots.
- Open Bernard › Settings › Local Settings › Security.
- Click Change Your Unlock Session Code.
- Draw your pattern (at least 4 dots), then confirm it by drawing it a second time.
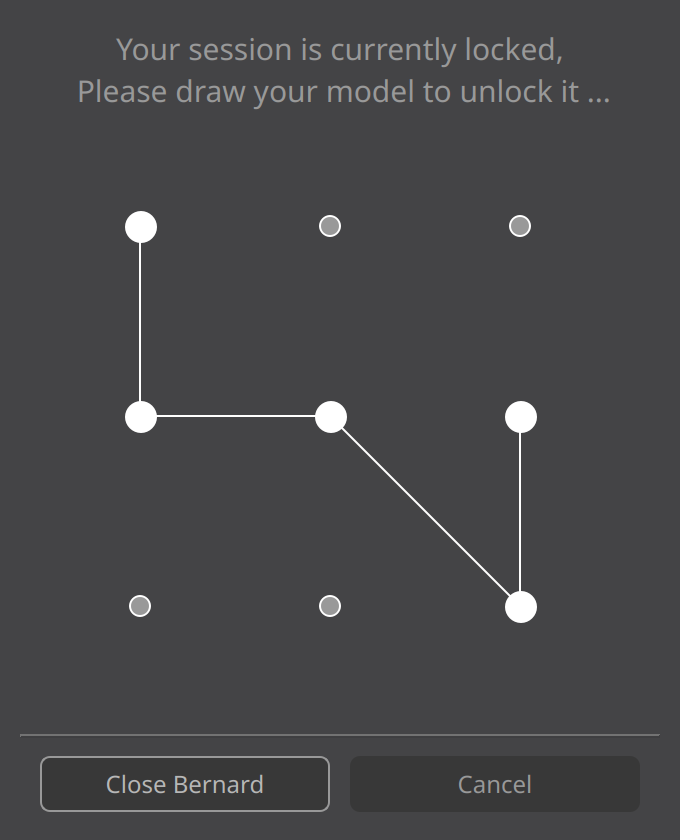
After three failures, Bernard imposes a wait that grows with each attempt. The window also offers Close Bernard and Cancel.
Accounts
- A user must be authorised (Authorized) by an administrator to log in.
- A password has at least 12 characters, with lowercase letters, uppercase letters and digits.
- Only an administrator can change Authorized, Is Admin and a user's role. Nobody can remove their own permissions.
Authorised workstations (reserved for administrators)
- Each workstation is a Computer object, recognised by its MAC addresses (MAC Addresses). An unknown workstation is created at first startup, under the machine's name.
- A workstation must be authorised (Authorized) by an administrator, never from that workstation itself. A new workstation is only authorised straight away for an administrator or a user who has Authorize Any Computer.
- A workstation can carry a list of authorised IP addresses (Ip List Allow). If empty, any address is accepted. Otherwise, the workstation's current IP address, shown in IP Address, must be in it.
- A refused workstation shows "Unauthorized Computer" and Bernard closes. A workstation whose authorisation is removed during a session is closed.
- Always Open: no automatic locking or closing (render workstation, screening room).
- Each user has a current workstation (Current Computer). Bernard › Check Current Computer checks it and offers to change it.
Sessions
- The inactivity, locking and closing delays are set in Global Settings.
- An administrator can close a user's session by giving a reason. Bernard shows it to the user and closes; their WIP tasks go to Pause.
- Navigate › Login as lets an administrator open Bernard under another user's identity, to test. A banner shows it and the administrator password is requested at restart.
Communications between Bernard and the synchronisation server are encrypted.
These rules are the application's access controls.
Day Type
Reserved for administrators.
What it is for: defining the day types (working day, weekend, public holiday, leave…) and what each one expects.
Where to open it: Bernard › Settings › Global Settings › Working Time › Day Type.
What you can do: Add New Day Type, then fill in for each type:
| Field | Meaning |
|---|---|
| Name, Description | the name and description of the type |
| Start Day | the start time of the day |
| Legal Pause | the break deducted from attendance |
| Expected Workload | the expected working time |
| Overtime Rate | the overtime factor |
| Can Be Override Per User | the type can be changed for one person |
| Dates | the days concerned ("Example: dd/mm/YYYY, 01/01/2019, 02/01/2019, ...") |
| Color | the colour of the type in the Working Time View |
Confirm with Apply, or cancel with Cancel.
Working Time
Reserved for administrators.
What it is for: setting how attendance and working time are computed.
Where to open it: Bernard › Settings › Global Settings › Working Time.
| Setting | Effect |
|---|---|
| Next Day Start After | the time at which Bernard changes day (3 a.m. by default). Night hours are filed under the right day; a session left open is cut at this time. |
| Late Margin | the tolerance before marking a late arrival |
| TimeLog Factor to get Working Time | the factor applied to the time spent on tasks to get working time, for the roles that have Compute working time based on Timelogs (vs Attendance) |
| Show punctuality info | show punctuality in the Working Time View |
Time spent is counted by the server, with no input: as long as a task is WIP, the assigned person's time builds up, per person and per day. A locked Windows session or a disconnected remote session puts the person in Idle straight away.
Notification (studio settings)
Reserved for administrators.
This section is Global Settings › Notification. In 2.1.48, it contains no setting: notification choices are made by each user, in Local Settings › Notification.
Notification (your notifications and following)
What it is for: choosing how you receive each type of notification, and what you follow.
Where to open it: Bernard › Settings › Local Settings › Notification, and its subsection Following.
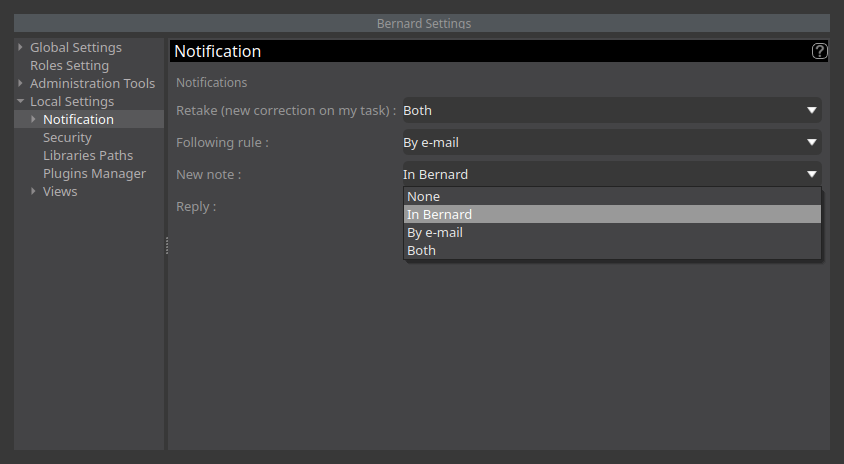
The channels: for each type, choose None, In Bernard, By e-mail or Both. The change applies immediately.
| Type | When | Default channel |
|---|---|---|
| Retake (new correction on my task) | a correction on a task you are assigned to, or that you are a recipient of | Both |
| Following rule | an object enters the result of one of your following rules | Both |
| New note | a note you are a recipient of | In Bernard |
| Reply | a reply | In Bernard |
E-mails are grouped: one summary per person every 5 minutes, 50 lines at most. A notification already read in Bernard is not sent by e-mail. An e-mail that cannot be sent is shown in Bernard.
Following (Following): Add New Following Rule creates a rule. Choose the object type (Object Type To Follow) and property values (Properties Value To Follow), for example the tasks you are assigned to that go Ready. Confirm with Apply.
In Bernard: the notification list offers Mark All As Read and Show Only Not Read. Clicking a notification marks it as read and selects the object. Bernard's icon in the system notification area shows a bubble for each note, correction or reply.
The notifications button is in the project bar, next to the user's picture.
Administration Tools
Reserved for administrators.
What they are for: the maintenance tools for the studio's database.
Where to open them: Bernard › Settings › Administration Tools. The section groups Clear old references.
The other administration functions are elsewhere: Navigate › Login as, the Tech tab of the Property panel, the display of deleted objects in the Tree View (Deleted Object).
Clear old references
Reserved for administrators.
What it is for: cleaning up the references to deleted objects that remain in other objects.
How to do it
- Open Bernard › Settings › Administration Tools › Clear old references.
- Set Keep objects that were deleted less than : (days): objects deleted more recently are kept.
- Click Remove unused references. A progress window is displayed.
- Bernard shows the number of elements cleaned up, or "No references to deleted items have been found".